I have a lot of devices which use serial consoles for my job, most of them with USB connectors but some with traditional 9-pin serial ports as well. Juggling connections for all of these can be a chore, but there are ways to simplify the process.
I have tried several different tactics over the years but the best solution I’ve found so far is to use a Raspberry Pi as a dedicated serial console multiplexer (MUX). The title seemed fitting as it takes multiple inputs (serial consoles) and manages a single output (screen) though the user controls the active input in this case.
Supplies
-
Raspberry Pi (or equivalent)
Though this post is geared toward using a Raspberry Pi with Raspbian as a serial console server, many of the techniques used are general and could be adapted to a variety of platforms.
-
USB serial hub with lots of ports
Like this 13-port USB 2.0 hub. Linux doesn’t seem to get along with lots of USB 3.0 ports and there isn’t any compelling reason to use USB 3.0 for serial consoles anyhow.
-
USB serial devices
Varies by device, some have USB consoles, some have serial ports with 9-pin or RJ45 connectors. Some may require null modem adapters. This is mostly beyond the scope of what I’m trying to cover here. I’m going to assume you can already talk to the devices with USB serial in some way.
Speaking of USB serial, I like these USB serial adapters for devices with regular non-USB serial ports.
-
GNU screen
GNU screen is capable of talking to serial ports directly, so there is no need to use a separate terminal emulator program such as
minicom. Though if you prefer to use a different terminal program in each screen or maybe usingtmux, similar tactics should work there, too.
Setup the hardware
Setting up the Pi is out of scope here, I’m going to assume you have a working pi connected to your network.
Using a wired connection is best for real-time interactive work in SSH, but depending on your AP and wireless setup it may still work OK that way.
Connect all of the USB serial devices to the hub and connect the hub to the Pi. To ensure things are probed in the correct and expected order, rebooting the Pi is a useful measure at this point.

From here on, everything is done over SSH connected to the Pi. Use the SSH program of your choice (e.g. OpenSSH, SecureCRT, PuTTY).
Map the serial ports to consistent names
Before setting up the consoles let’s take the time to map each port to a consistent and useful name. Rather than having them numbered, we can set it up so that each port is labeled after the device. This makes keeping the screen names and purposes easier to manage over time. If you are lucky and each one has a unique set of properties, then it won’t even matter which order or ports they plug into or what order they probe in.
Gather device attributes
Look at the connected USB ports:
$ ls -l /dev/ttyUSB*
crw-rw---- 1 root dialout 188,  0 Mar 29 11:36 /dev/ttyUSB0
crw-rw---- 1 root dialout 188,  1 Mar 29 11:42 /dev/ttyUSB1
crw-rw---- 1 root dialout 188,  2 Mar 29 11:53 /dev/ttyUSB2
crw-rw---- 1 root dialout 188,  3 Mar 14 16:08 /dev/ttyUSB3
crw-rw---- 1 root dialout 188,  4 Mar 11 14:04 /dev/ttyUSB4
For each of these, go through the device information and find useful and unique
properties which identify a given device. This will give us enough information
to craft udev rules to setup the port names. The command probes the entire
stack to reach the device, but the one you are interested in is usually a few
entries into the output and will look similar to what is shown below.
Replace x in the command with the device number, and repeat the command for
each ttyUSB device.
$ sudo udevadm info --name=/dev/ttyUSBx --attribute-walk
[...]
  looking at parent device '/devices/platform/soc/3f980000.usb/usb1/1-1/1-1.1/1-1.1.3/1-1.1.3.2':
[...]
    KERNELS=="1-1.1.3.2"
    ATTRS{manufacturer}=="Silicon Labs"
    ATTRS{idProduct}=="ea60"
    ATTRS{devpath}=="1.1.3.2"
[...]
    ATTRS{serial}=="xxxxxx01"
[...]
    ATTRS{idVendor}=="10c4"
This is an ideal case. The device has a unique vendor ID (idVendor), product
ID (idProduct), and serial number (serial). Not every device will have a
serial number and multiple devices may even have the same serial number, which
complicates matters.
The trickier cases may have to rely on the device path (devpath) which means
they have to remain plugged into the same USB port.
Setup udev rules
Create or edit /etc/udev/rules.d/99-usb-serial.rules and add rules based on
the attributes for each device along with its name.
$ sudo vi /etc/udev/rules.d/99-usb-serial.rules
# These two devices are similar but have unique serial numbers.
SUBSYSTEM=="tty", \
	ATTRS{idVendor}=="10c4", \
	ATTRS{idProduct}=="ea60", \
	ATTRS{serial}=="xxxxxx01", \
	SYMLINK+="serial_edge"
SUBSYSTEM=="tty", \
	ATTRS{idVendor}=="10c4", \
	ATTRS{idProduct}=="ea60", \
	ATTRS{serial}=="xxxxxx02", \
	SYMLINK+="serial_server"

# These two devices don't have a serial number,
# so we have to use the device path
SUBSYSTEM=="tty", \
	ATTRS{idVendor}=="067b", \
	ATTRS{idProduct}=="2303", \
	ATTRS{devpath}=="1.1.3.7.4", \
	SYMLINK+="serial_switch1"
SUBSYSTEM=="tty", \
	ATTRS{idVendor}=="067b", \
	ATTRS{idProduct}=="2303", \
	ATTRS{devpath}=="1.1.3.7.6", \
	SYMLINK+="serial_switch2"

# This device has a unique vendor and product ID, but use the serial
# number anyhow in case a similar device is added in the future.
SUBSYSTEM=="tty", \
	ATTRS{idVendor}=="0403", \
	ATTRS{idProduct}=="6001", \
	ATTRS{serial}=="xxxxxx03", \
	SYMLINK+="serial_adapter"
Reload and test
Now reload the rules and re-trigger the device detection:
$ sudo udevadm control --reload-rules
$ sudo udevadm trigger --attr-match=subsystem=tty
Now look at the mapped devices with our nice names:
$ ls -ld /dev/serial*
drwxr-xr-x 4 root root 80 Oct 24 15:09 /dev/serial
lrwxrwxrwx 1 root root  7 Oct 24 15:09 /dev/serial1 -> ttyAMA0
lrwxrwxrwx 1 root root  7 Oct 24 15:09 /dev/serial_edge -> ttyUSB2
lrwxrwxrwx 1 root root  7 Oct 24 15:09 /dev/serial_server -> ttyUSB1
lrwxrwxrwx 1 root root  7 Oct 24 15:09 /dev/serial_switch1 -> ttyUSB4
lrwxrwxrwx 1 root root  7 Oct 24 15:09 /dev/serial_switch2 -> ttyUSB3
lrwxrwxrwx 1 root root  7 Oct 24 15:09 /dev/serial_adapter -> ttyUSB0
These will come back on reboot and when devices are unplugged and replugged.
It’s a good idea to reboot at this point to ensure the custom names return as expected.
Check privileges
Ensure that your user can access the serial ports. By default in Raspbian the
user is pi and it is a member of the dialout group, and the dialout group
has permission to access the ttyUSB* devices. If you use another user, add it
to the dialout group.
$ sudo usermod -a -G dialout myuser
Alternately, you can run screen through sudo, but that is typically
unnecessary with proper permissions and group memberships.
GNU screen
GNU screen allows a user to run multiple concurrent terminal sessions from a single login session. This is much easier to manage than multiple SSH connections to the same server, with the added benefit that screen can “detach” and leave the terminals connected in the background while the user does other things or even logs out. Later, the user can resume the screen session and it is as if they never left.
Many devices will output critical messages to the serial console and if the user isn’t watching the console when they happen, they can be easily missed. Using screen with a large scrollback buffer means the user can monitor these devices and look back at recent output, search it for specific strings, or even write it out to a file.
Setup screen configuration
Create a configuration file for this dedicated instance of screen:
$ vi .consoles.screenrc
Add in some useful configuration options along with definitions for each of the serial terminals.
# Handy terminal defaults
termcapinfo xterm ti@:te@
termcapinfo xterm-color ti@:te@
termcap xterm 'is=\E[r\E[m\E[2J\E[H\E[?7h\E[?1;4;6l'
terminfo xterm 'is=\E[r\E[m\E[2J\E[H\E[?7h\E[?1;4;6l'
vbell off

# Status line -- careful the second line is quite long!
hardstatus alwayslastline
hardstatus string '%{gk}[%{G}%H%{g}][%= %{wk}%?%-Lw%?%{=b kR}(%{W}%n*%f %t%?(%u)%?%{=b kR})%{= kw}%?%+Lw%?%?%= %{g}]%{=b C}[%m/%d/%y %C %A]%{W}'

# Misc other defaults
shell -$SHELL
logtstamp on
logtstamp after 1

# No need for the intro screen
startup_message off

# 50000 lines of scrollback per window
defscrollback 50000

# Custom session name
sessionname consoles

# Definitions for each separate screen
screen -t 'Edge'     /dev/serial_edge    115200
screen -t 'Server'   /dev/serial_server  115200
screen -t 'Switch-1' /dev/serial_switch1 115200
screen -t 'Switch-2' /dev/serial_switch2 115200
screen -t 'Adapter'  /dev/serial_adapter 115200
Replace the names, serial devices, and serial port speeds as needed to match your own setup.
The example above works on GNU Screen 4.x, but GNU Screen 5.x changed the syntax for colors. I have a separate post about that, but to keep it short here, use the following status line instead if the host has version 5:
hardstatus alwayslastline
hardstatus string '%{2;0}[%{+b10;0}%H%{-}][%= %{7;0}%?%-Lw%?%{+9;0}(%{+15;0}%n%f %t%?(%u)%?%{-})%{-} ^H%?%+Lw%?%= %{-}]%{+b14;0}[%m/%d/%y %c]%{-}%{-}'
Using GNU screen
Overview
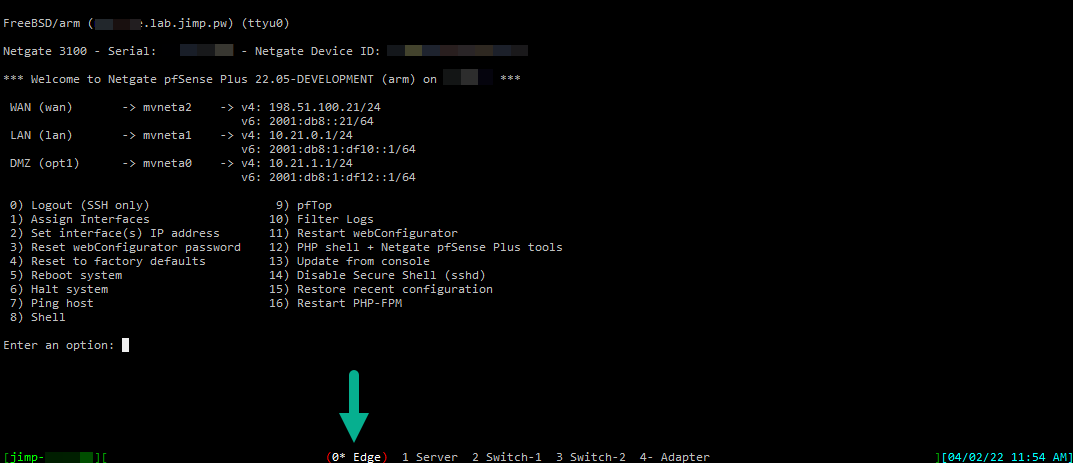
When screen is running it will display a nice status bar with screen numbers and
the short names we set above with -t <name>.
Start screen
This command starts screen using our custom configuration file:
$ screen -c ~/.consoles.screenrc
Resume a screen session that is already running
This command resumes our specially named session (consoles) in multi-display
mode.
$ screen -S consoles -x
In multi-display mode the user can remain connected to the screen from multiple separate SSH login sessions simultaneously.
Screen commands
The following commands are entered in screen by pressing Ctrl-A (Hold the
Ctrl key and tap the a key), then release both and press the next key. For
brevity, this will be abbreviated like ^A-d for pressing Ctrl-A then d.
^A-d- Detach- Leaves the session running in the background and returns the user to the shell.
^A-DD(Shift+Dtwice) - Power detach- Detach and logout in a single step.
^A-a- Toggle next/last screen- Changes between the current screen and the last used screen. If on the first screen, it switches to the next one. Press again to swap back and forth.
^A-<num>- Switch to a specific screen number- Changes to a specific numbered screen
0-9 ^A-n- Next screen- Changes to the next screen in order
^A-p- Previous screen- Changes to the previous screen in order
^A-<esc>- Scrollback buffer mode- Enters scrollback history mode. Moving through the buffer depends on the
terminal program and settings. It may move with arrow keys,
hjkl, or even the mouse scroll wheel. Type?<string>to search backward,/<string>to search forward. PressEscagain to exit. ^A-\- Quit- Terminates screen.
^A-:- Screen command prompt- Accepts a text command from the user. For example, to write the contents of
the entire scrollback buffer to a file, use
:hardcopy -h outfile.txt. ^A-?- Help- Displays a help page with a list of commands and other information.
Finish up
With this in place, you can detach from the screen session and leave it running indefinitely and reattach as needed. This is great for monitoring consoles in case something goes wrong and prints logs or console messages for debugging.