This post may still be helpful, but I compiled a much more comprehensive reference site for updating Anduril lights at https://anduril.click/.
Recently some lights have started using ATtiny1616 chips with a 3-pin flashing pad interface for firmware updates. Notably, this includes the Wurkkos TS10 and Sofirn SP10 Pro, but possibly covers new revisions of others lights such as the Sofirn LT1, LT1 Mini, SC31 Pro, SP36, and Q8.
This interface is, in some ways, much easier to work with than the previous ones I’ve dealt with. Less pins to worry about lining up, easier to adapt parts on hand, and so on. That said, it does have its drawbacks, such as possibly requiring different software to update and also a new serial interface board since it doesn’t work with USBASP like the other lights.
Supplies
-
Serial USB to TTL CH340 Module device
The one linked specifically works great as-is, so I suggest using that one. There are others out there that may require soldering in a resister or certain diode, but these modules do not need it.
-
Jumper wires with Dupont connectors
The CH340 linked above comes with some wires that have M-F connectors which can help with some parts of this but for most probes you will likely need F-F.
-
Flashing kit from Hank (US Source) or another probe with at least three pogo pins in line, such as an HQ ProgKey.
I have used both my HQ ProgKey and Hank’s probe. Both work fine, but the HQ ProgKey can be used on a wide variety of lights thanks to its 4-over-4 layout. I ordered a couple batches of the HQ ProgKey from OshPark and used soldering paste and a reflow plate to attach pogo pins to the ProgKey. For many people that’s probably overkill, but it does work well for updating my non-Hank lights.
Why Update?
Why update? It depends.
Sometimes there are important software bug fixes. For example, the stock TS10 firmware had a couple problems. The aux lights stayed on while the main emitters were on, and it lacked low voltage protection for its single color aux LEDs, so the aux LEDs (especially on high) could drain a battery to dangerously low levels.
There are other reasons to update, such as:
- For new quality of life changes, like the recent changes in lockout behavior
(3C from lockout to unlock off instead of just 4C to unlock and turn on). The
new TS10 firmware also lowers the moonlight from about
0.1lumens to0.01lumens which is a significant decrease. - If you have multiple Anduril lights, it’s convenient to have all the lights using the same UI and you don’t have to remember which ones work which way because they had slightly different Anduril versions on them from the OEM.
- Maybe you are like me and geek out on this kind of stuff and like doing it
Wiring up the Probe
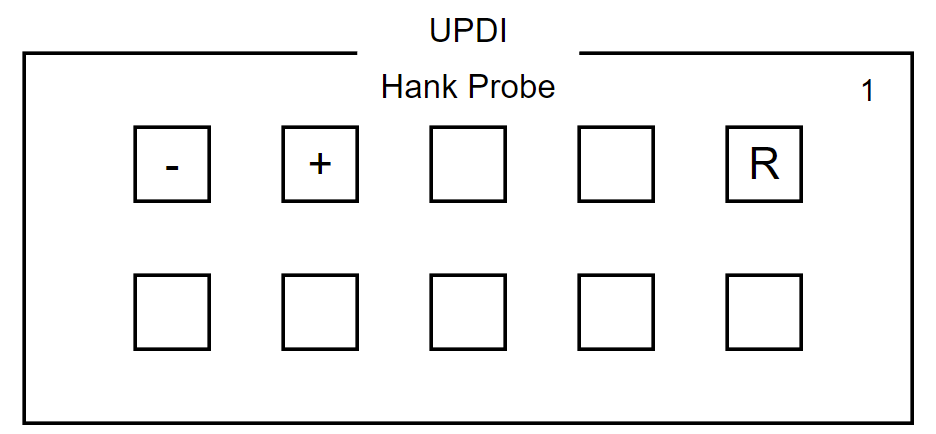
If using Hank’s kit, with the four pin side up, use the first three pins left to right:
- Pogo Pin 1: Top row, far right:
R/RX+TX - Pogo Pin 2: Top row, far left:
-/GND - Pogo Pin 3: Top row, second from left:
+/3V3
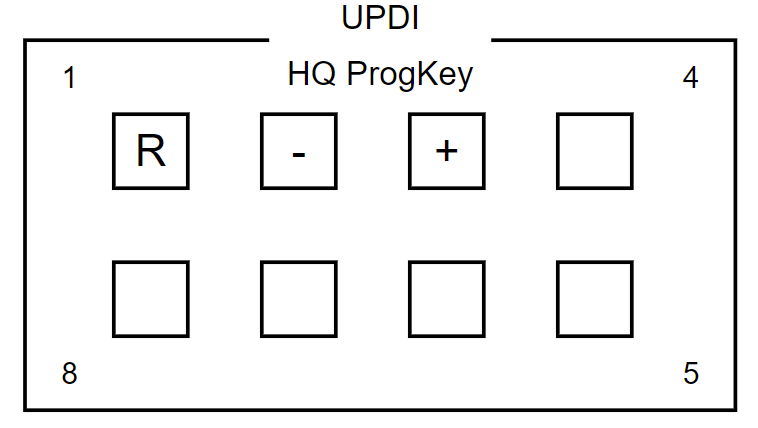
If using a custom adapter, wire the pins up similarly:
- 1:
R/RX+TX - 2:
-/GND - 3:
+/3V3
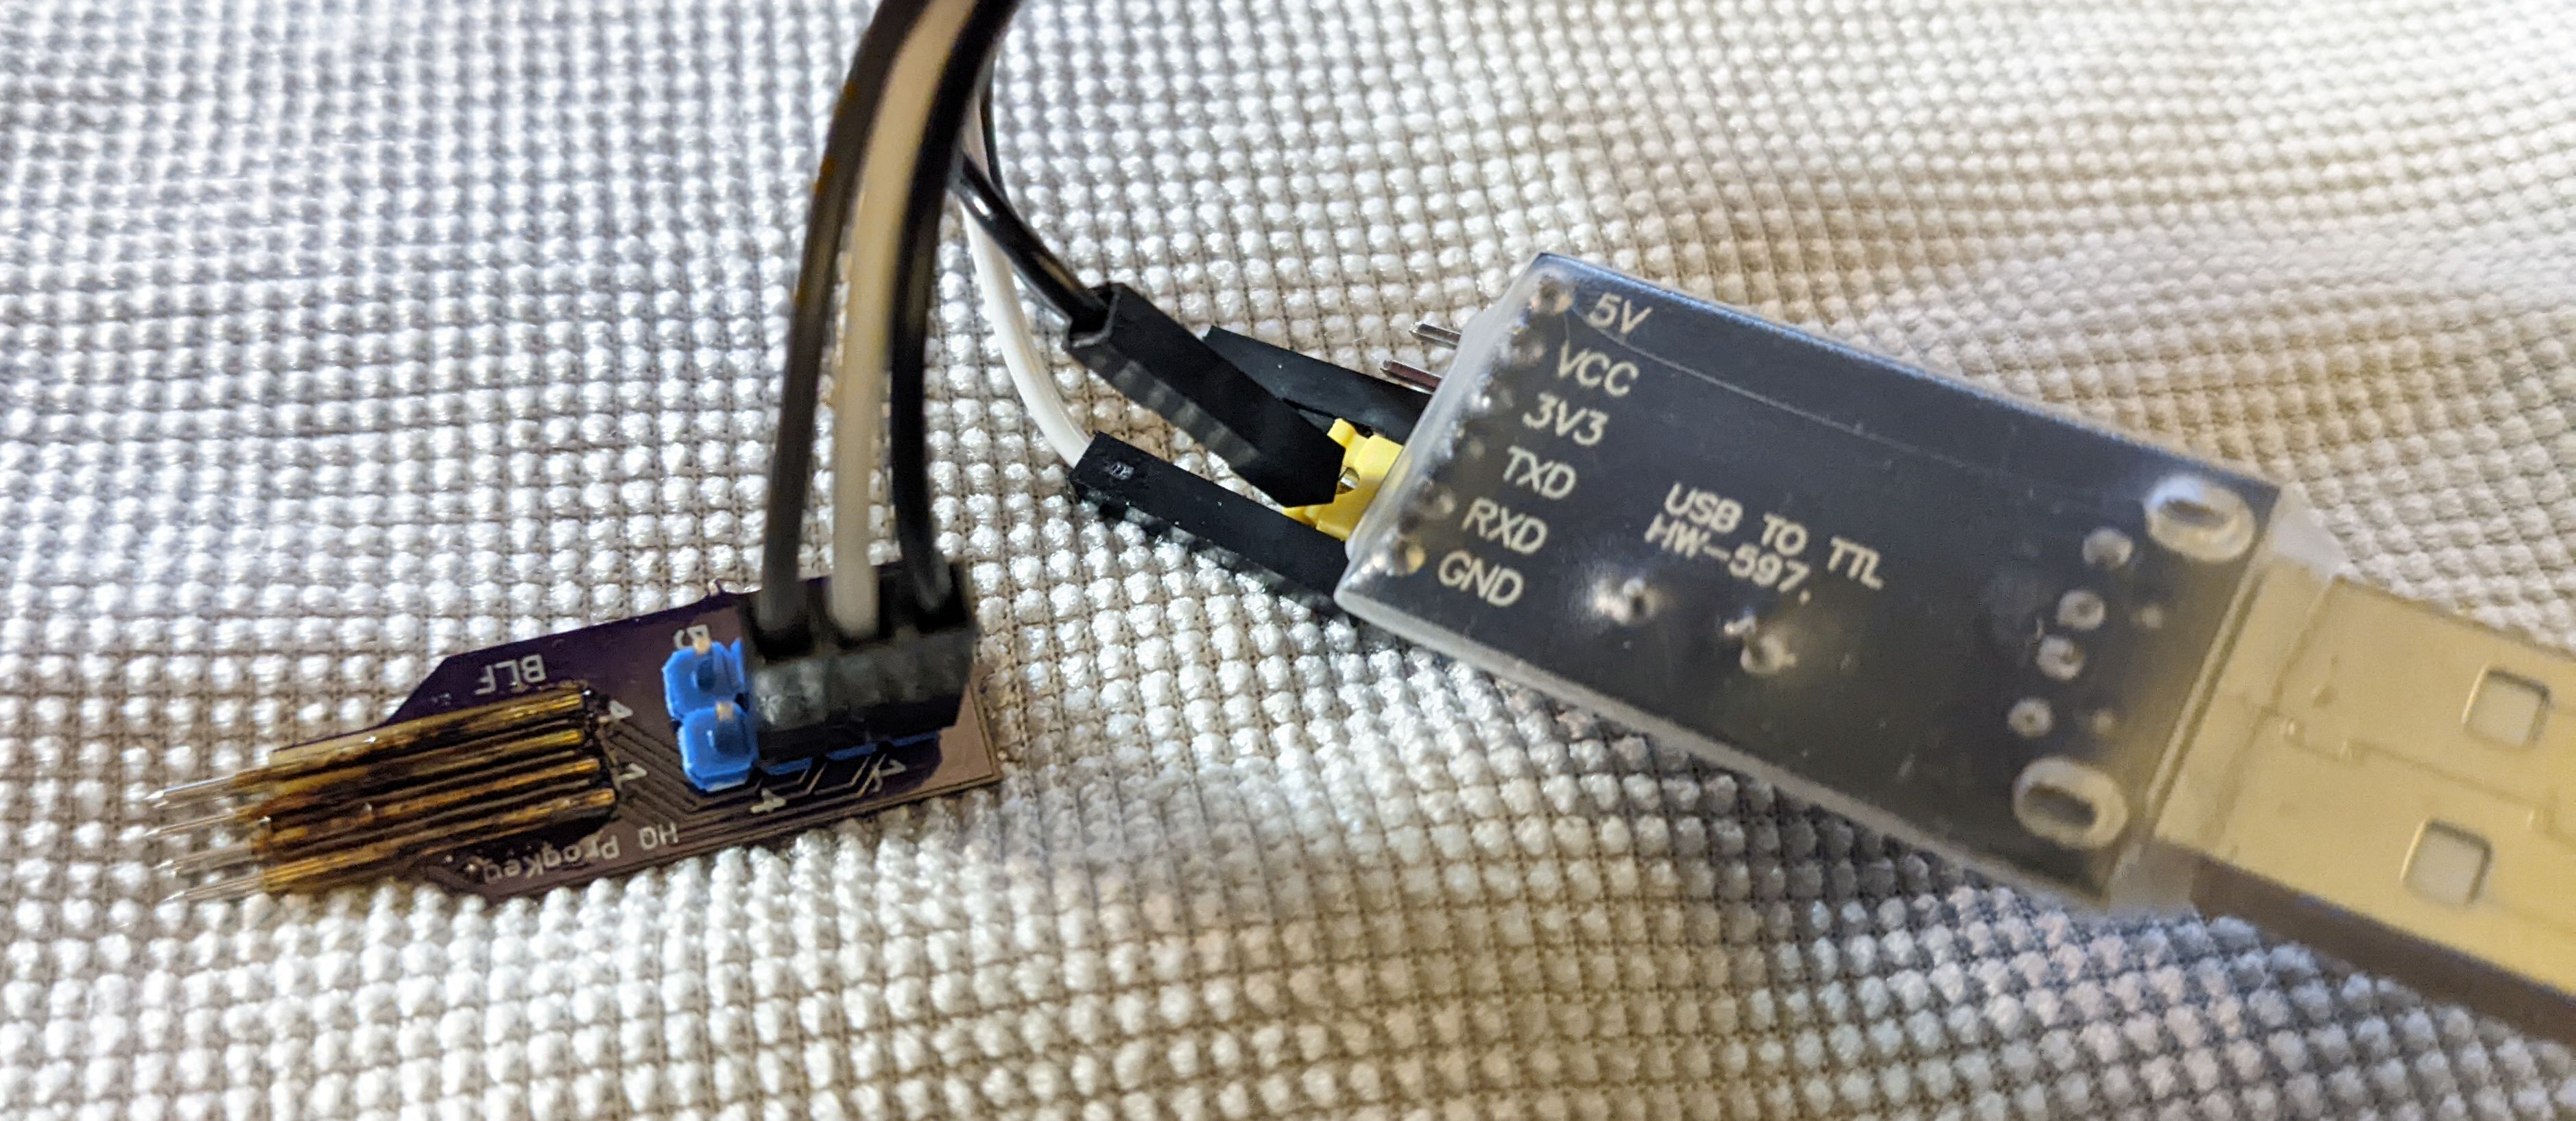
On the CH340 device linked above, the RX and TX pins are separate but they
come with a jumper. The RX/TX wire needs to connect to both pins, which
can be done in a variety of ways. Some people prefer to solder a pin on the
jumper, or solder a wire across both, or connect two wires and splice them into
a single line midway. Personally, I pushed a pogo pin into a Dupont connector
and simply wedged it the opening at the top of the jumper. Pressure from the
neighboring wires keeps it in place and it makes a good enough connection for
this purpose. A similar trick would likely work with a male Dupont connector
end. Soldering is a more reliable and permanent solution, but thus far my
workaround has not
failed.
Connecting the Probe to the Light
Unscrew the head from the light and look inside. These lights will have three
pads and they are hopefully labeled properly as either: R - + / + - R.
Align the probe so the pins match the pads.
Install Drivers and Locate the Serial Port
Unfortunately at the moment there isn’t a way to program with these chips from Android, so use a computer with the right drivers.
This could be Linux, Windows, or macOS. Requirements vary by platform.
Plug the USB device in and let the OS detect it and install drivers.
Windows
On Windows:
- Right click the Start/Windows button
- Click Device Manager
- Expand Ports (COM & LPT)
-
Locate the port labeled “USB-SERIAL CH340” and note the port listed after
For example
COM7.
If there is a ! and the same port is in the list twice:
- Double click the “USB-SERIAL CH340” device
- Click the Port Settings tab
- Click Advanced
- Change the device to a different (unused) COM port number
Linux
On Linux, the device will be /dev/ttyUSB<id> for example, /dev/ttyUSB0 . If
there are multiple devices, the correct device is likely the highest one or one
with the newest timestamp.
macOS
On macOS, the device will be /dev/cu.usbserial-<id> , the ID will vary by
hardware. If there are multiple devices, the correct device is likely the one
with the newest timestamp.
Firmware File
Get the correct firmware file, or compile one.
Do a firmware check on the light (15+ clicks, note each digit it flashes) and compare the date and IDs returned. Last four digits should be the Anduril model ID. This is mostly for reference in case there is a discrepancy between what the light was running before and what is loaded after.
For the Wurkkos TS10 or Sofirn SP10 Pro, check at https://www.ghart.com/blf/firmware/hex_files/sofirn_anduril2/ for the latest revision for the light in question. As of this writing, the newest files for the Wurkkos TS10 is anduril.2022-07-19.wurkkos-ts10.hex, Sofirn SP10 Pro is anduril.2022-07-23.sofirn-sp10-pro.hex – Those are likely to change over time.
For other lights, check http://toykeeper.net/torches/fsm/anduril2/
Running the Update
There are two ways to update currently, with either avrdude or pymcuprog.
avrdude
The recently released avrdude 7.0 now supports updating through these interfaces and avrdude may already be familiar for those updating firmware since it is a common way to update other lights that use USBASP boards.
- Download the latest release
- Extract it using whatever tool is handy (e.g. Windows Explorer, 7-Zip, or other file manager or built-in OS utility
- Copy the firmware file(s) to the same directory as avrdude to make it easier
- Open a command prompt and change to the directory where the contents were extracted
Ping the Device to Ensure Connectivity
The first thing to try is to ping the device to ensure that avrdude can talk to both the CH340 device and the target chip. Replace the serial port in the following command with the port used by the CH340 device:
.\avrdude.exe -p attiny1616 -c serialupdi -P com7 -n
The output should look like this:
avrdude.exe: UPDI link initialization OK
avrdude.exe: Device is in SLEEP mode
avrdude.exe: NVM type 0: 16-bit, page oriented write
avrdude.exe: Entering NVM programming mode
avrdude.exe: AVR device initialized and ready to accept instructions

Reading | ################################################## | 100% 0.01s

avrdude.exe: Device signature = 0x1e9421 (probably t1616)
avrdude.exe: Leaving NVM programming mode

avrdude.exe done.  Thank you.
If there is an error, most likely the probe was not correctly contacting all of the correct pins. Check and correct the probe placement and try again.
Read the Old Firmware
A good practice is to read the old firmware in case the new firmware has an undesirable behavior. That way it’s possible to reload the previous firmware to get back to the prior state.
.\avrdude.exe -p attiny1616 -c serialupdi -P com7 -Uflash:r:old-firmware.hex
The output should look like this:
avrdude.exe: UPDI link initialization OK
avrdude.exe: Device is in SLEEP mode
avrdude.exe: NVM type 0: 16-bit, page oriented write
avrdude.exe: Entering NVM programming mode
avrdude.exe: AVR device initialized and ready to accept instructions

Reading | ################################################## | 100% 0.01s

avrdude.exe: Device signature = 0x1e9421 (probably t1616)
avrdude.exe: reading flash memory:

Reading | ################################################## | 100% 4.02s

avrdude.exe: writing output file "old-firmware.hex"
avrdude.exe: Leaving NVM programming mode

avrdude.exe done.  Thank you.
Write the New Firmware
Now it is time to write the new firmware. Replace the filename in the following command with the correct firmware filename.
.\avrdude.exe -p attiny1616 -c serialupdi -P com7 -Uflash:w:anduril.2022-07-19.wurkkos-ts10.hex
The output should look like the following:
avrdude.exe: UPDI link initialization OK
avrdude.exe: Device is in SLEEP mode
avrdude.exe: NVM type 0: 16-bit, page oriented write
avrdude.exe: Entering NVM programming mode
avrdude.exe: AVR device initialized and ready to accept instructions

Reading | ################################################## | 100% 0.01s

avrdude.exe: Device signature = 0x1e9421 (probably t1616)
avrdude.exe: NOTE: "flash" memory has been specified, an erase cycle will be performed
             To disable this feature, specify the -D option.
avrdude.exe: erasing chip
avrdude.exe: reading input file "anduril.2022-07-19.wurkkos-ts10.hex"
avrdude.exe: input file anduril.2022-07-19.wurkkos-ts10.hex auto detected as Intel Hex
avrdude.exe: writing flash (9562 bytes):

Writing | ################################################## | 100% 3.87s

avrdude.exe: 9562 bytes of flash written
avrdude.exe: verifying flash memory against anduril.2022-07-19.wurkkos-ts10.hex:
avrdude.exe: input file anduril.2022-07-19.wurkkos-ts10.hex auto detected as Intel Hex

Reading | ################################################## | 100% 1.85s

avrdude.exe: 9562 bytes of flash verified
avrdude.exe: Leaving NVM programming mode

avrdude.exe done.  Thank you.
Now that the firmware is written to the light, skip ahead to the section on performing a factory reset.
Python and pymcuprog
If avrdude is not a viable choice, install Python and pymcuprog.
On Windows, there are two main ways to get Python:
- Use the installer from Python
- Install from the Microsoft Store
After installing python, open a command prompt and install pymcuprog by
running pip install pymcuprog
Fix Python Path
There may be some quirks getting the paths right for pymcuprog if Python was
installed from the Microsoft Store, since the location for the packages is not
in the path by default.
Try running pymcuprog from a terminal, PowerShell, or command prompt, if it
prints its usage output, then it’s OK to proceed. Otherwise, check and correct
the path or python issues.
In Explorer, first locate the correct folder. It will be something similar to
C:\Users\<name>\AppData\Local\Packages\PythonSoftwareFoundation.Python.3.9_<id>\LocalCache\local-packages\Python39\Scripts
– Copy that full path.
The correct path will also be found in the output of
python -c "import sys; print('\n'.join(sys.path))"
it will be the entry similar to the path mentioned previously.
- Right click on the Start/Windows button
- Click System
- Click Advanced System Settings
- Click Environment Variables
- Find the entry for Path in the User variables section and select it
- Click Edit
- Add the path to the list (paste it in or type it out)
- Click OK, then OK again to close the Environment Variables window
- Click OK one more time to close System Properties
Ping the Device to Ensure Connectivity
The first thing to try is to ping the device to ensure that pymcuprog can talk
to both the CH340 device and the target chip. Replace the serial port in the
following command with the port used by the CH340 device:
First, try a ping to see if the device responds to a probe:
pymcuprog ping -d attiny1616 -t uart -u com7
The output should look like the following if it’s successful:
Connecting to SerialUPDI
Pinging device...
Ping response: 1E9421
Done.
If there is an error, most likely the probe was not correctly contacting all of the correct pins. Check and correct the probe placement and try again.
Erase the Firmware
Unlike avrdude, pymcuprog does not automatically erase before writing, so do a manual erase:
pymcuprog erase -d attiny1616 -t uart -u com7
The output should look like the following:
Connecting to SerialUPDI
Pinging device...
Ping response: 1E9421
Chip/Bulk erase:
- Memory type eeprom is conditionally erased (depending upon EESAVE fuse setting)
- Memory type flash is always erased
- Memory type lockbits is always erased
Erased.
Done.
Write the Firmware
Change to the directory where the firmware file was downloaded, for example:
cd ~\Downloads
Now write the firmware file. Replace the filename with the correct firmware filename that matches the light.
pymcuprog write -d attiny1616 -t uart -u com7 --verify -f anduril.2022-07-19.wurkkos-ts10.hex
The output should look like the following:
Connecting to SerialUPDI
Pinging device...
Ping response: 1E9421
Writing from hex file...
Writing flash...
Verifying flash...
OK
Done.
Factory Reset
After writing the firmware, it’s a good idea to do a factory reset. Hold in the power button while reassembling the light and let go of the button when the light goes out.
On some tail switch lights it helps to fully tighten the tube first, then back it off enough that the aux lights (or main emitter) goes out, then hold the button while twisting it back fully closed.
See Also
This post was based in part on information from the following threads: